
I have been wanting to play a bit with LoRaWAN for some time, but there wasn’t any coverage where I am, so I decided to make my own gateway that bridges the LoRaWAN wireless network with The Things Network backend services. This will bring coverage to the area I’m in and allow both myself but also other people in the area to set up nodes that uses my gateway to send information to the network.
There are many ways to make a gateway, and some of the cheaper options is to use a Raspberry Pi and combine it with something like a Dragino LoRa HAT, but a gateway like that, will only support a single channel, and with multiple nodes and sharing it with other people, this is not ideal.
There has also been a bunch of projects using the IMST iC880a module, a Raspberry Pi and often a custom PCB to connect everything and then housed in some sort of customized box.
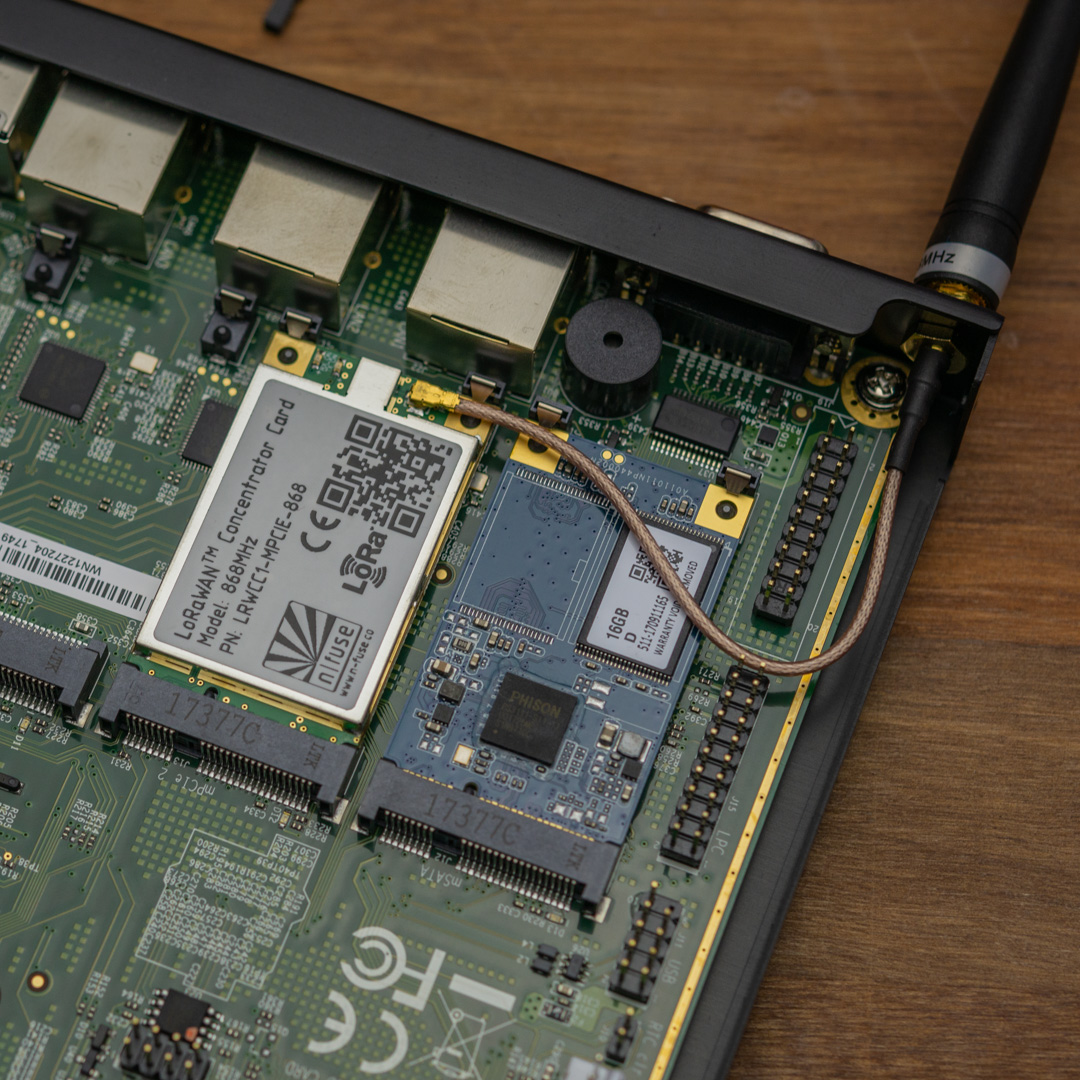
The option I have chosen to go with is to use the APU2C4 from pcEngines and the enclosure designed for it, paired with an n|fuse LoRaWAN Concentrater miniPCIe card. This combination uses hardware that is designed for networking and the APU2 can most likely also do other tasks like being a general gateway or similar at the same time without breaking a sweat.
This project is devided in to three parts:
- Installing the hardware
- General install of Debian linux on the APU2
- Installation and configuration of the LoRa packet forwarder software
- Testing the LoRaWAN gateway
Hardware installation
The APU2 usually comes in seperate pieces, unless you have purchased it from a supplier that does the assembly for you. It’s pretty straight forward putting it together, but it’s a good idea to have a look at the APU2 assembly instructions when it comes to the heat spreader and how to mount that correctly.
The mSATA SSD goes in the first slot (the one behind the serial port, marked mSATA) and I chose to put the n|fuse LoRa Concentrator card in the next slot marked mPCIe 2, so that the antenna pigtail I bought with the card could easoly reach out to the mounting hole right next to the serial port in the APU2 case. This way I can install either a 4G WAN card or a WiFi card in the last slot and wire the antenna to the mounting hole on the other side of the case.
Debian install on APU2
I am using macOS, so some of the commands below is specific to that platform, but most of the stuff will be very similar on Linux.
Making USB boot media:
The easiest way to boot up the APU2 for the first time is in my opinion to boot use a bootable USB memory stick. To make one of those with the Debian installer on macOS follow the below steps:
- Find the device name of your USB memory stick (macOS specific):
$ diskutil list - Unmount the device that is your USB memory stick (macOS specific):
$ diskutil unmountDisk disk2 - Use
ddto copy the downloaded Debian install image to the USB stick:$ sudo dd if=debian-9.6.0-amd64-netinst.iso of=/dev/disk2 bs=8m - Eject the USB stick from you computer (macOS specific):
$ diskutil eject disk2
Connect serial cable
You will need either a serial port on you computer or a serial adapter. I am using a USB-C to Serialport adapter combined with a null-modem cable to connect to the serial port on the APU2. You should connect and run the following command before powering up the APU2, so that you can follow along from the early bootup stage and select the right bootmedia.
- In your terminal run the following command (the exact name of the device will most likely differ on your machine, depending on the type of serial port you have)
$ screen /dev/tty.usbserial-A505IYUR 115200 -
Insert your USB memory stick into the APU2 and power it up.
-
Press
F10when prompted and select the USB stick as boot media -
At the Debian installation menu, select
“Help“or press“H” - Then type the following to start the install with console output going to the serial port (depending on the specific version of the installer, you might need to press
F8before entering the command below):$ install console=ttyS0,115200n8You might get a warning regarding display, but you can just ignore that, there are no display on the APU2
-
Proceed through the installer as usual with a Debian install. When setting up network, you should know that the first ethernet port is the one closest to the serial port. I usually don’t install any additional packages during the install, but manually install what I need afterwards.
-
When you have completed the install, you can remove the USB memory stick and reboot the machine and it should now automatically boot into your newly installed Debian and present you with a login prompt on the serial connection.
- I normally install an SSH server as one of the first things, so that I can log in remotely. It’s usually faster and not as cumbersome to administer a machine that way compared to using the serial interface.
LoRaWAN packet forwarder install
The software we will use to communicate with the LoRaWAN concentrator and forwards packets to The Things Network backend service is the picoGW packet forwarder from the LoRa Network.
Install LoraGateway dependencies:
We will get the software from Github and build the software locally, so we need a few dependencies installed before we move on:
$ apt-get install git
$ apt-get install build-essential
Get the software
In this setup, we put the gateway software in a subdirectory of your home directory
$ cd ~
$ mkdir loragateway
$ cd loragateway
$ git clone https://github.com/Lora-net/picoGW_packet_forwarder.git
$ git clone https://github.com/Lora-net/picoGW_hal.git
Build the packaet forwarder
This is simply changing into the two directories and running make to build the two projects.
$ cd picoGW_hal
$ make clean all
$ cd ..
$ cd picoGW_packet_forwarder
$ make clean all
Get the chip ID from the concentrator card
You will need this ID when adding the gateway on The Things Network and in the configuration file as metioned below.
$ cd picoGW_hal/
$ ./util_chip_id/util_chip_id
Registering and configuring the gateway
It’s now time to make an account on https://console.thethingsnetwork.org/ if you haven’t already and then add your gateway.
-
Update
global_conf.jsoninpicoGW_packet_forwarder/lora_pkt_fwd/to have thegateway_IDprovided from the above command. It’s in thegateway_confsection towards the end of the file. -
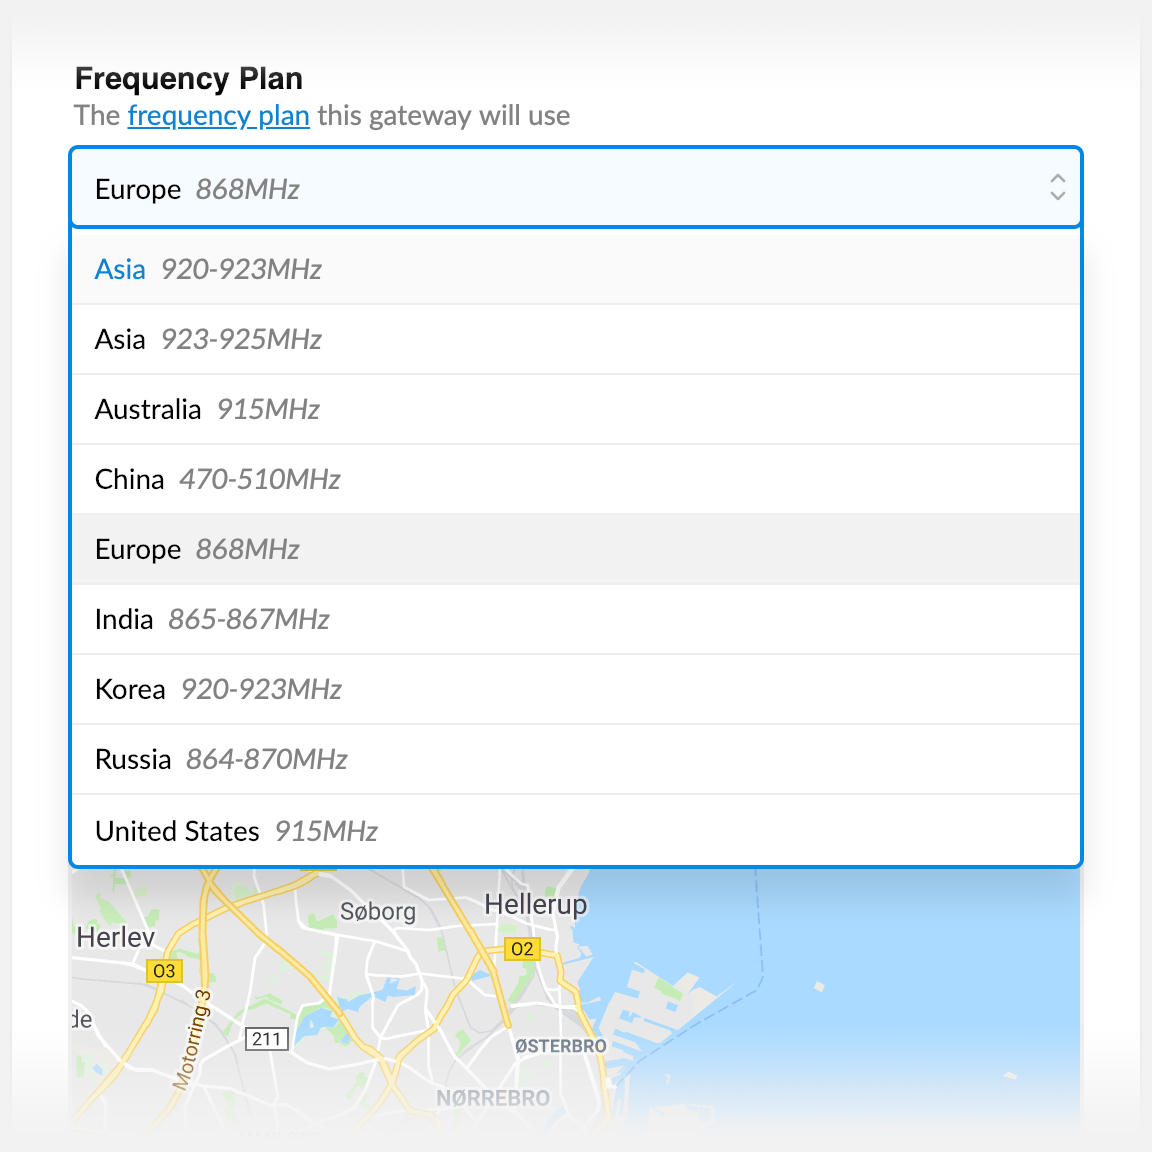
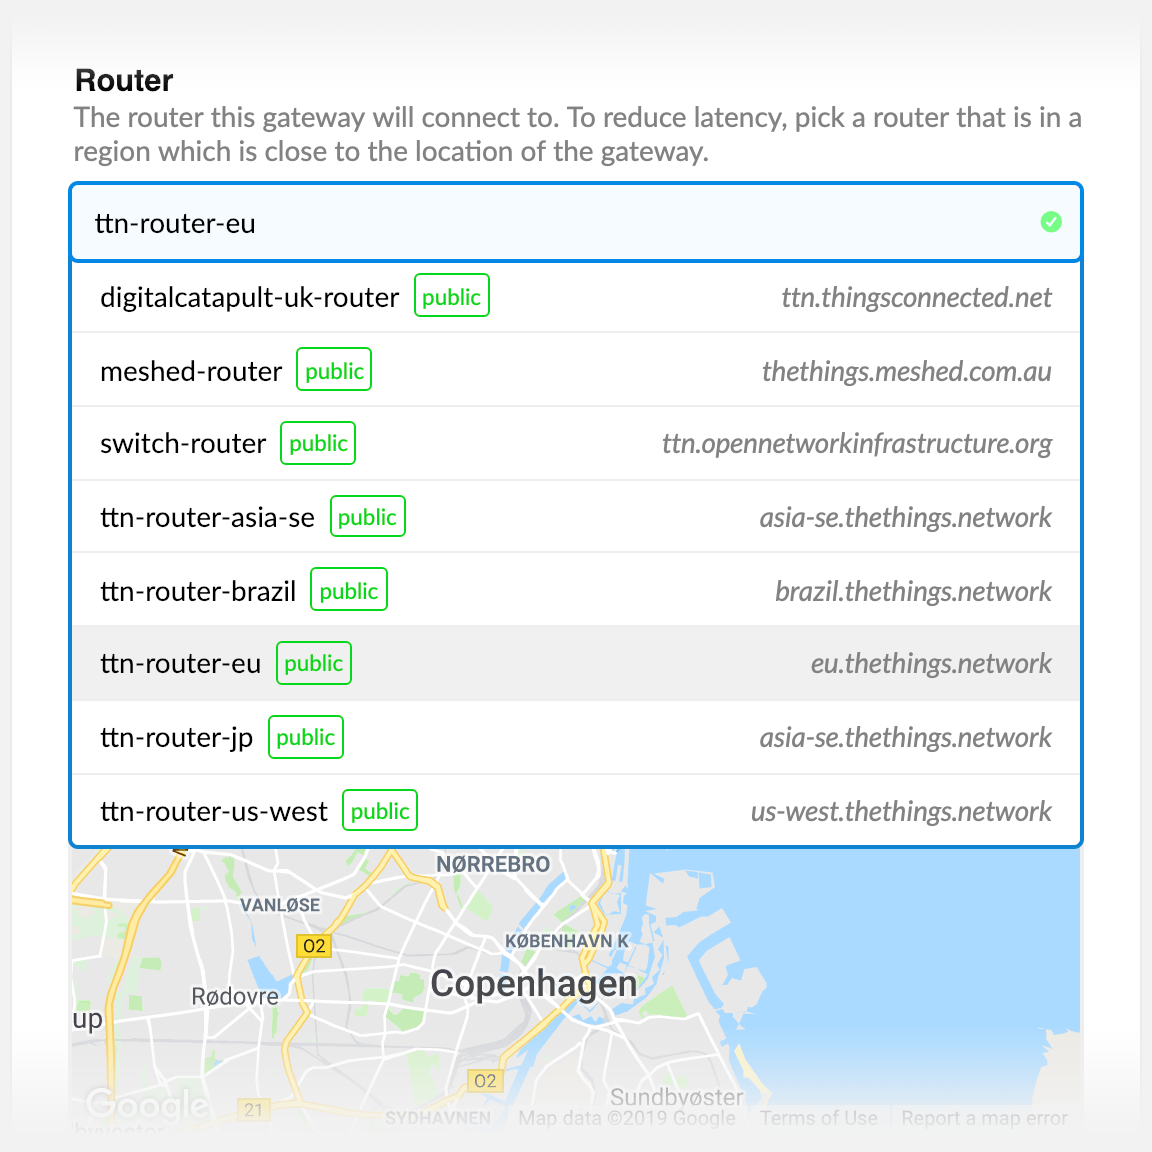
You will also have to configure the
server_addressparameter to reflect the region you are in. I’m in Europe, so I configured mine torouter.eu.thethings.network. When you register your gateway and select your region, there is a list of URLs in the drop down under “Router”. -
I also changed the
server_port_upandserver_port_downto both use1700. -
Register your gateway on
https://console.thethingsnetwork.org/. You will have to tick the box “I’m using the legacy packet forwarder” and then paste in the EUI ID you got from the above command - the same one you used in theglobal_conf.jsonfile.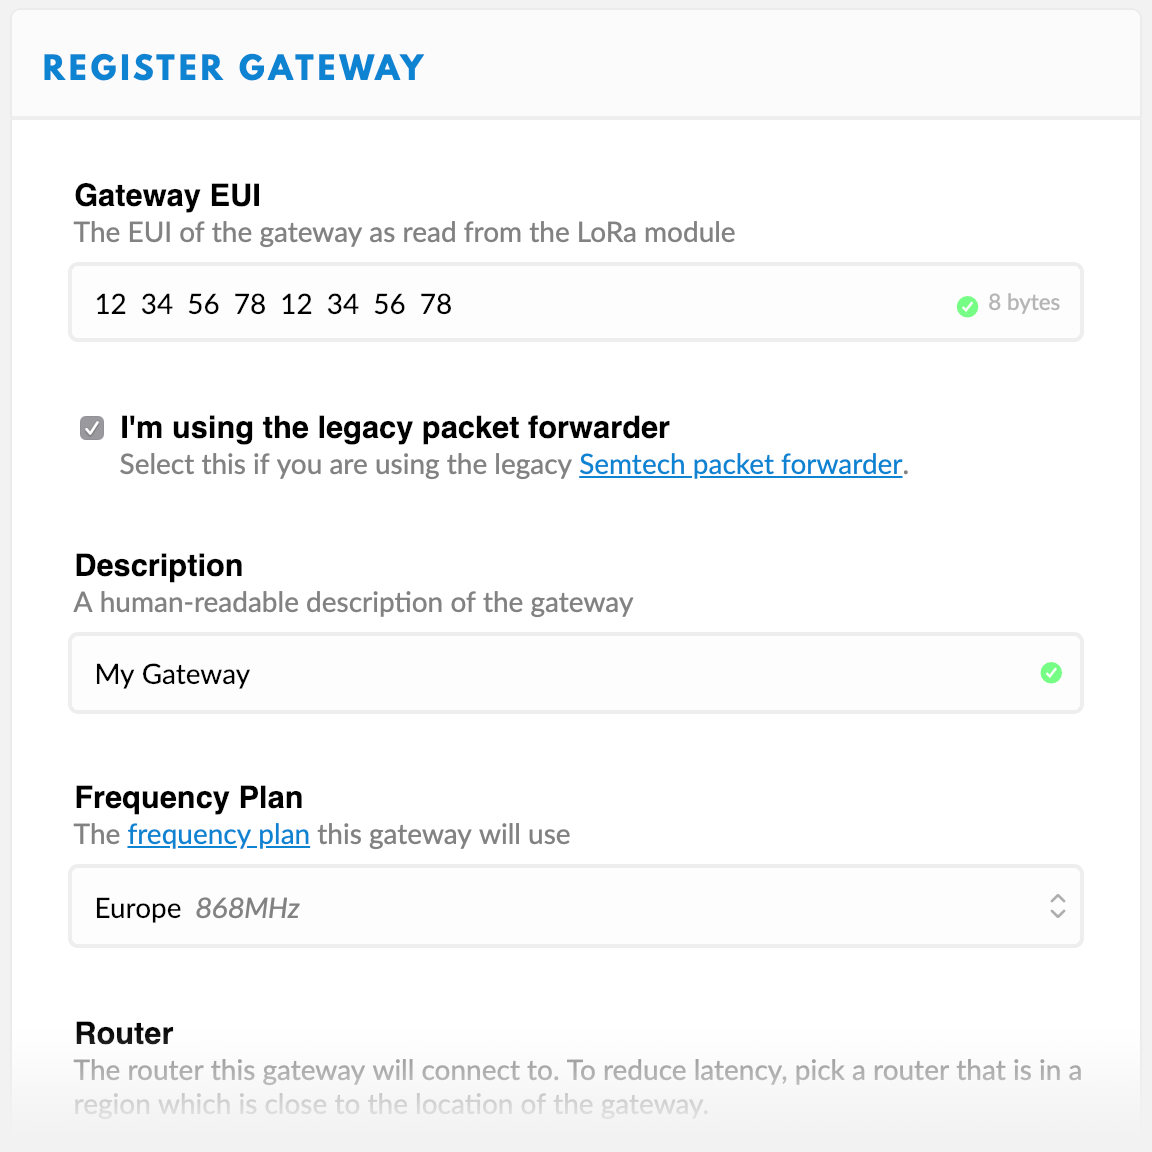 You can also put in a description and you will have to select a frequency plan. If you are in Europe, it should be 868MHz.
 In the bottom, you have the option to place your gateway on a map and describe the type of antenna you use.
 -
Run the forwarder to test if everything works
$ ./lora_pkt_fwdIf the above command starts without any errors and the connection to the internet is up and running, you should be able to see the status change to “connected” under the gateway on
https://console.thethingsnetwork.org/.
If it looks good, you can stop the forwarder again using [ctrl]+[c]
Configuring the forwarder as a service
Start by making a new file (I’ll use ´nano´ here, but you can use your favorite editor)
$ nano /lib/systemd/system/pkt_fwd.service
and paste in the following
[Unit]
Description=Semtech packet-forwarder
[Service]
WorkingDirectory=/home/tf/loragateway/picoGW_packet_forwarder/lora_pkt_fwd
ExecStart=/home/tf/loragateway/picoGW_packet_forwarder/lora_pkt_fwd/lora_pkt_fwd
Restart=on-failure
RestartSec=30
[Install]
WantedBy=multi-user.target
then edit the paths to match the installation path and save the file.
You will then need to reload the systemd deamon and enable the packet forwarder service:
$ systemctl daemon-reload
$ systemctl enable pkt_fwd.service
You can then start the service using:
$ systemctl start pkt_fwd.service
and if you need to, you can stop it using:
$ systemctl stop pkt_fwd.service
Since it’s now set up and installed as a service, it will automatically start when the machine boots up.
Testing the LoRaWAN gateway
Now, when you have the gateway up and running, you can start testing with a LoRaWAN device. If you configure the device to connect to The Things Network and set it up to send some data, you can monitor the activity on the gateway using the console under Gateways > your gateway > Traffic.
The traffic view lists all packets running through the gateway, both joins, uplink and downlinks and also other devices in the neighbourhood, so if you are in a
busy area, you don’t need to have your own devices to test this out.