
For a some of the events that have been forced to move online and do a pure remote participation this year, I have decided to make a few unofficial electronic badges.
It’s a bit of an experiment in open source and super low volume manufacturing in a global context, where participants are all at home, more or less in lockdown.
The reason this can work at all is that making prototype PCBs has become very accessible, with production either in the US or Europe or with relatively cheap shipping from China. Ordering 3, 5 og maybe 10 pcs. of a PCB you have designed is a fairly easy process and even with express shipping half way around the globe, its less than $100 with nice features like ENIG finish and often takes only 1-2 weeks all in all.
So my experiment is to make PCB designs and share them for people to customize, modify and build upon and then order themselves, so that we can have something together, when we sit across the world and participate remotely via livestreaming and chat systems.
The two events are KiCon 2020 Virtual Edition and the Hackaday Remoticon 2020. Both of these events have a solid foundation in electronics hardware so I found it fitting to add a bit of #badgelife.
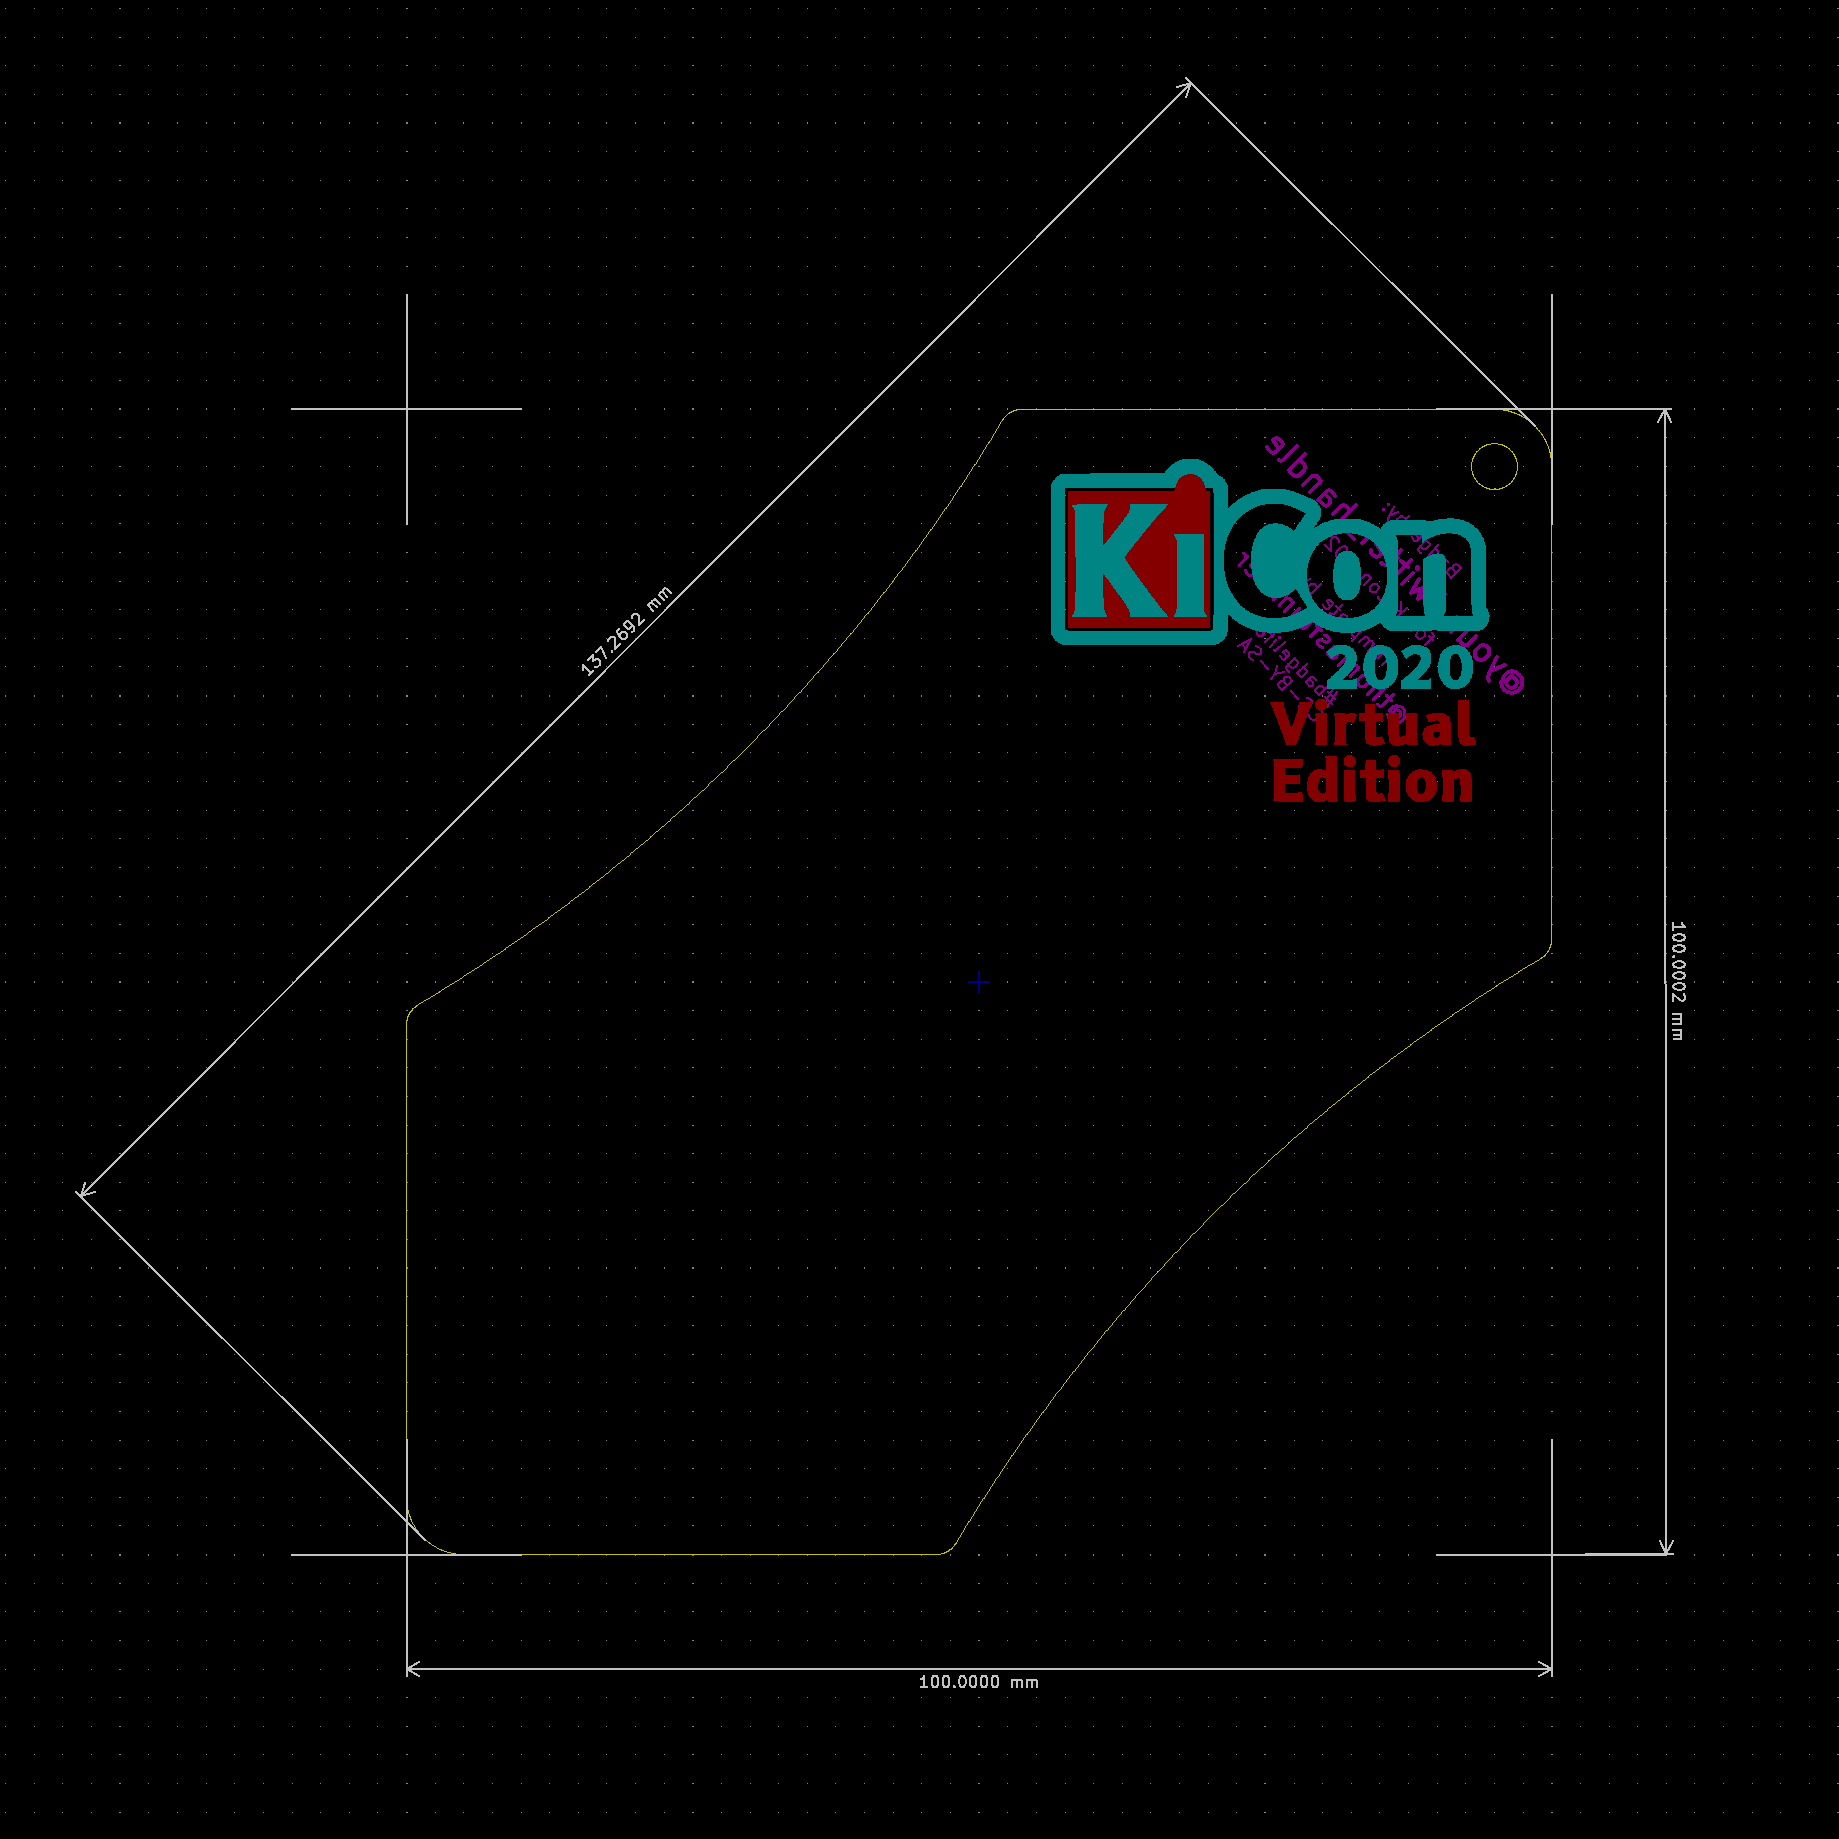
Unofficial KiCon 2020 Virtual Edition Badge
Since KiCon is all about PCB design and the primary toppic this year was the upcomming version 6 release, I decided to make a badge template to use as a starting point. The idea is to have a design that can be scaled and modified with different electronics, manufactured in different colors and still be recognisable as somewhat belonging together, so I went with an elongated hexagon with a few of the lines curved in a bit for a slightly more interesting shape. I also made in so it fit perfectly inside a 100x100mm square, since that is one of the really cheap sizes in many fab houses.
I started sharing the relatively blank template and then went on to add in the stuff that I wanted on my version of the badge.
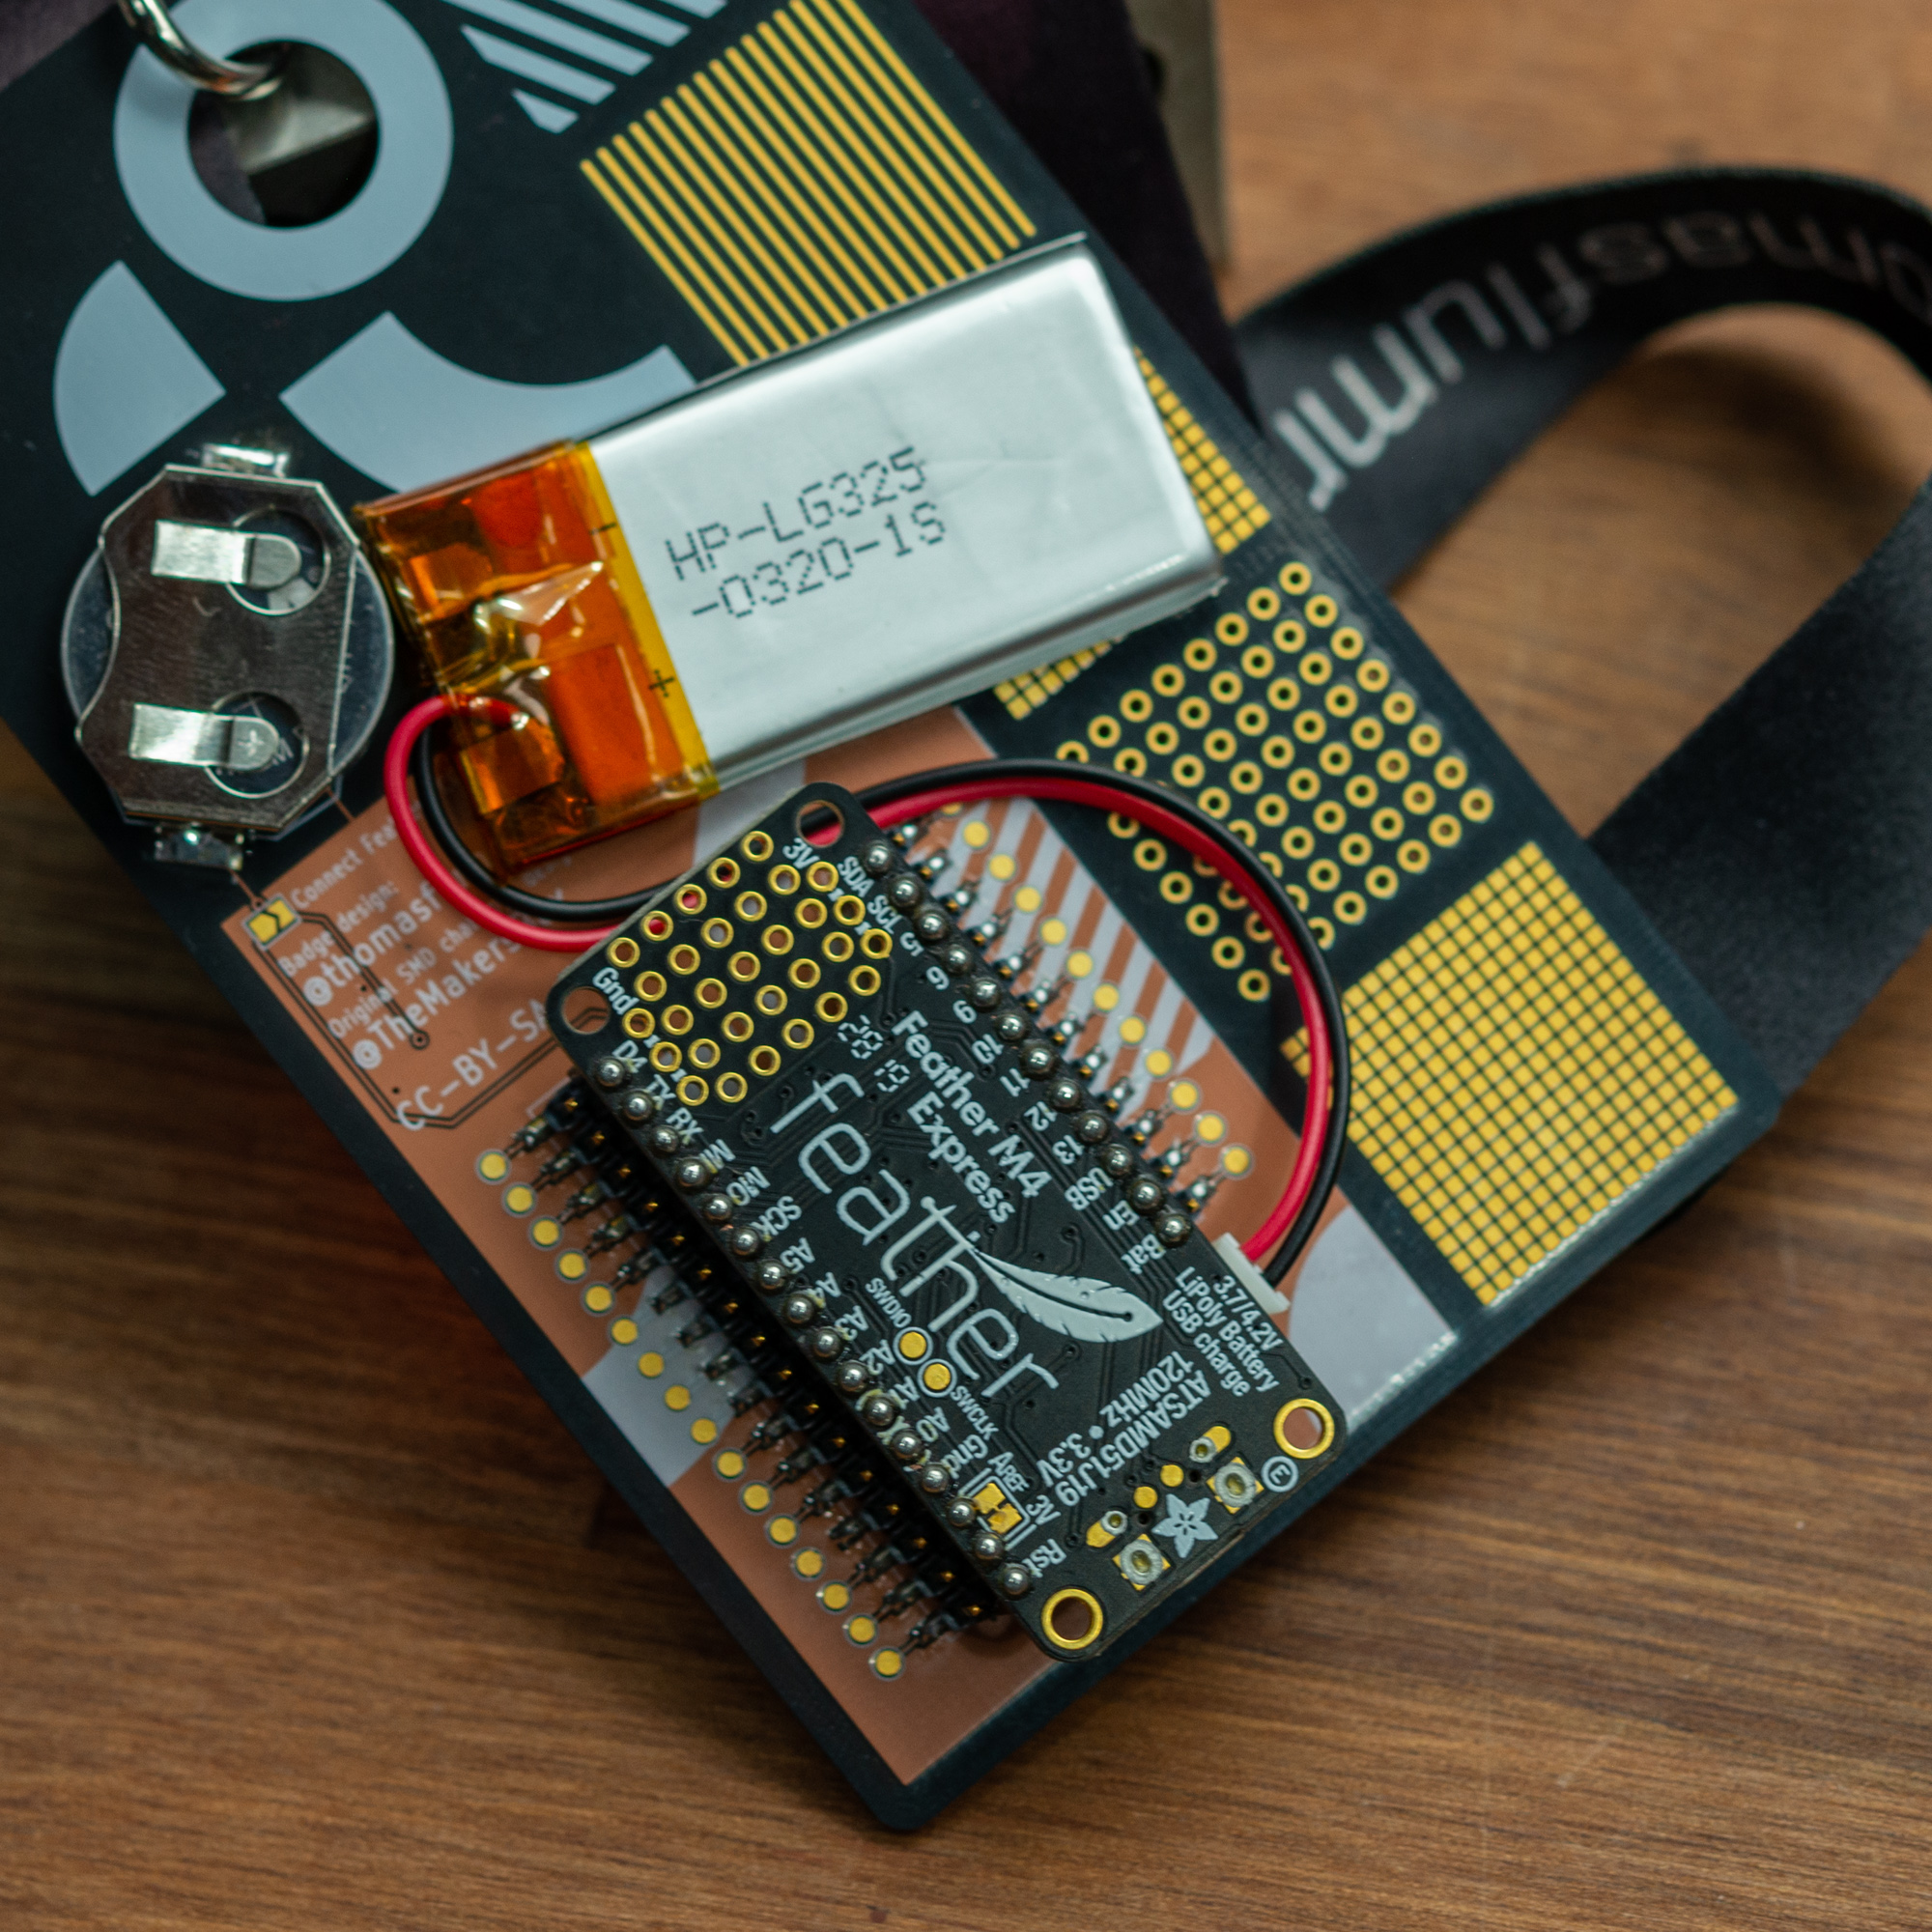
Having designed the 2020 BornHack badge a few months ago, I decided to reuse the controller setup from that, but for power, I wanted to experiment and try out using a LiPo battery and USB charging, so the schematic sheet for power was replaced with a new one and so was the blinky part of the badge, adding in a bunch of tiny RGB LEDs.
I designed all of this in the nightly builds of KiCad, so that I could try out a few of the new features. There is a bunch of small things, but one of the major ones is a big overhaul of the schematics file format and I think somewhat related, the way copying now works. It is now possible to select parts of a schematic, copy it and then open another schematic and paste in what you copied. It sounds simple and it is, but very convenient when reusing parts from other designs.
Sharing designs is also a bit easier with KiCad version 6, since the new schematic format has all the symbols embedded in the schematic file, eliminating the need to share your library separately.
When it comes to PCBNew, one thing that is very nifty is the new selection filters, that allows you to limit selection of elements to eg. only components. This makes it much easier to quickly move around stuff in the beginning, because you won’t accidentally grap the outline or some silkscreen or have to confirm selection nearly as often.
The last few prototype PCBs I have assembled has been with a solder paste stencil, tweezers for component placing and then “baking” the PCB on an electric cooktop. The heat isn’t really even and the temperature curve is no where near were it’s supposed to be, but for a couple of badges for myself to try out a few things it actually works quite well and it’s very cheap and handy as it does not take up a lot of space when not in use.
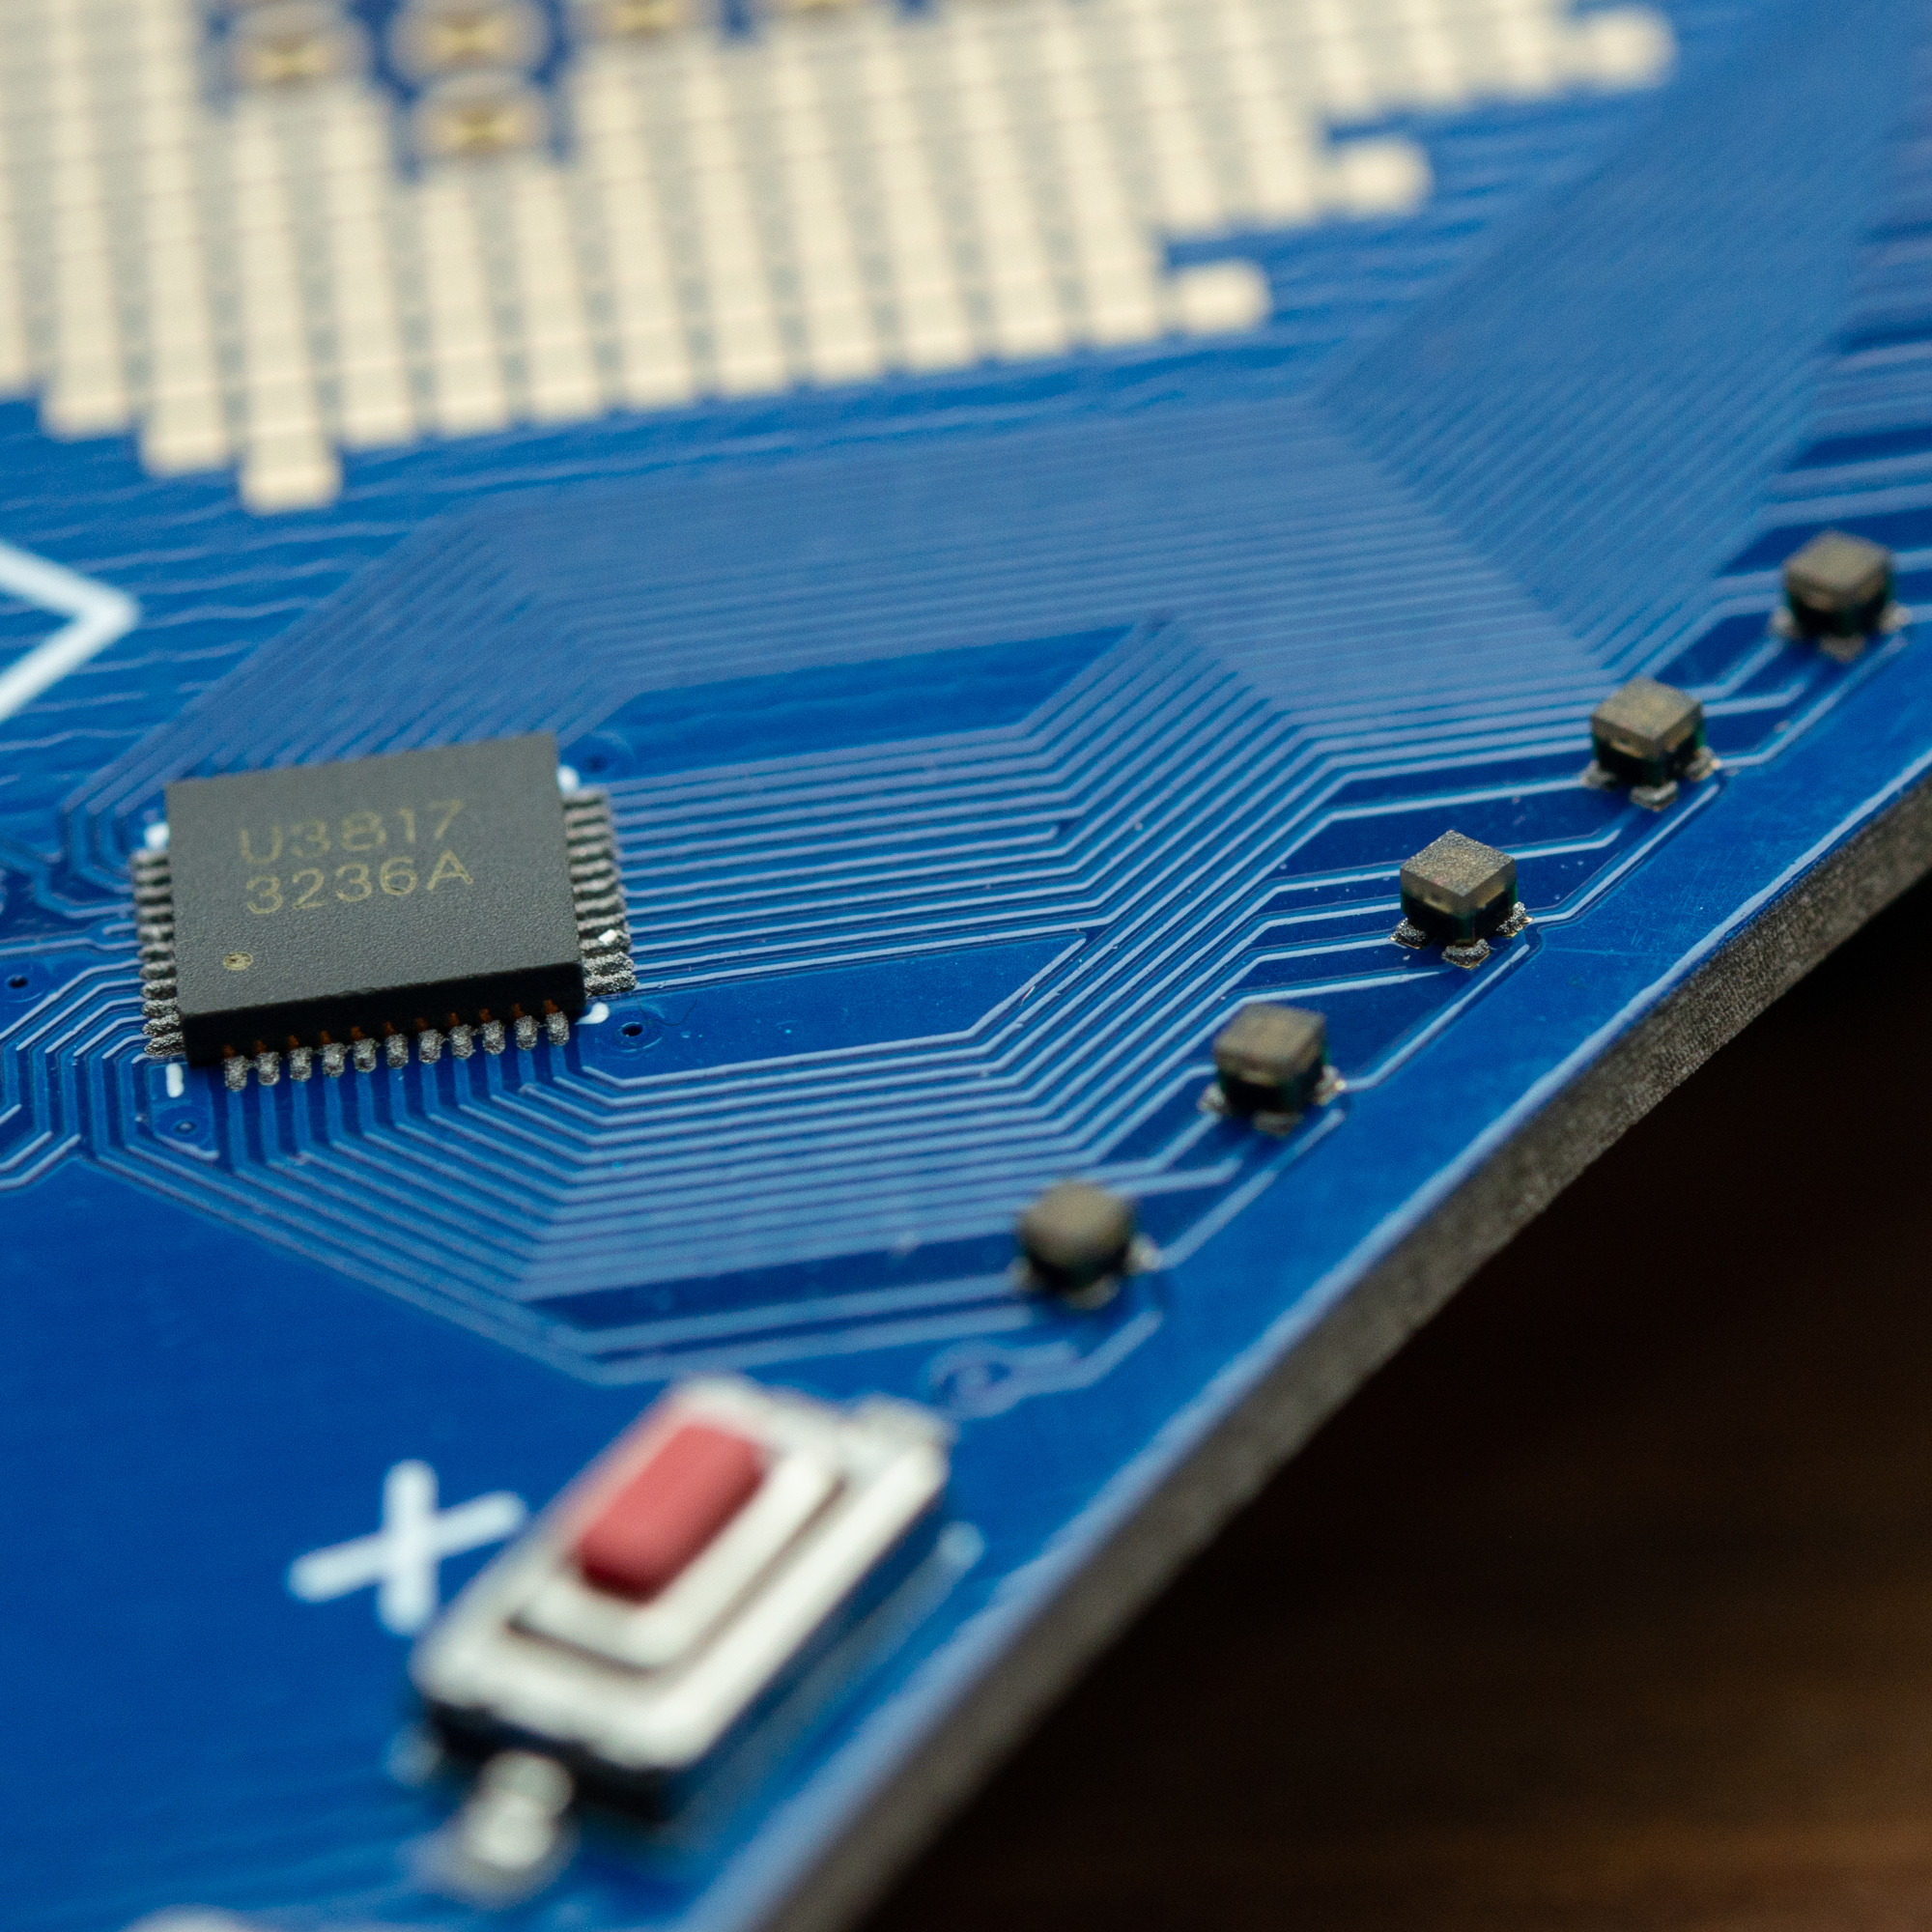
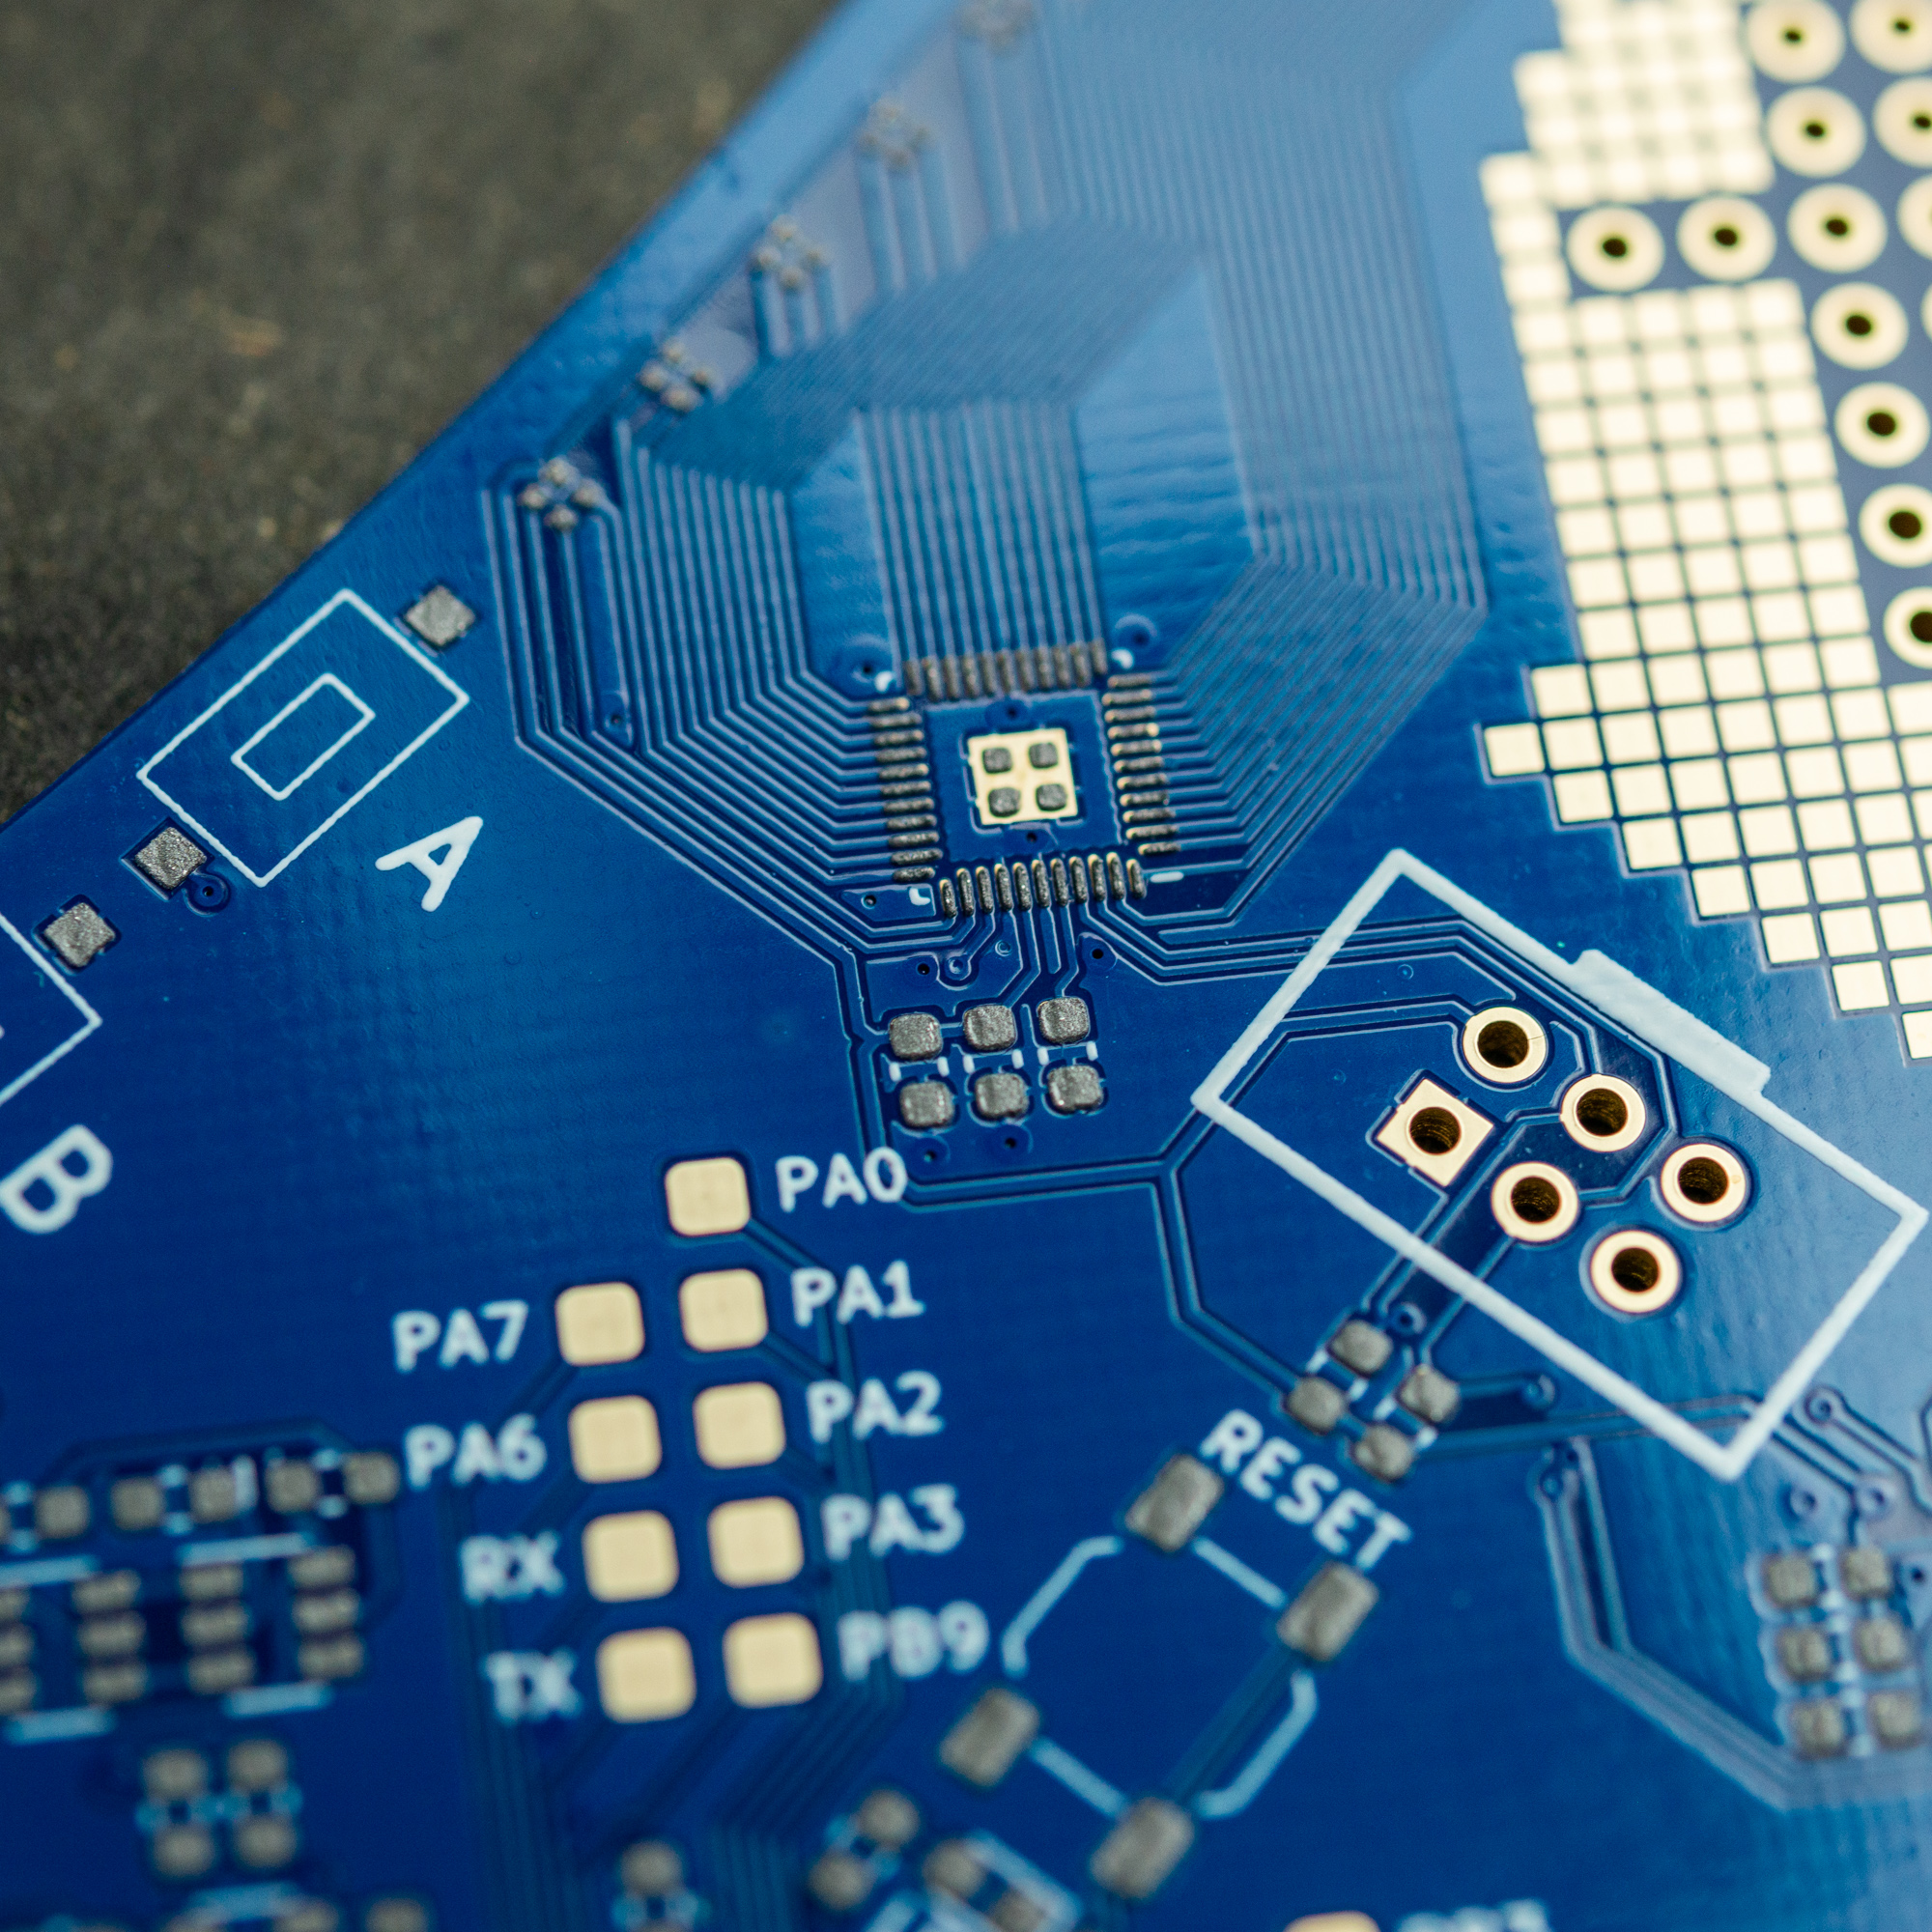
The LED controllers are QFN-44 with 0.4mm pin spacing and I was a little worried there would be bridges, but I guess my stencilling was pretty good, because I didn’t have to fix anything afterwards.
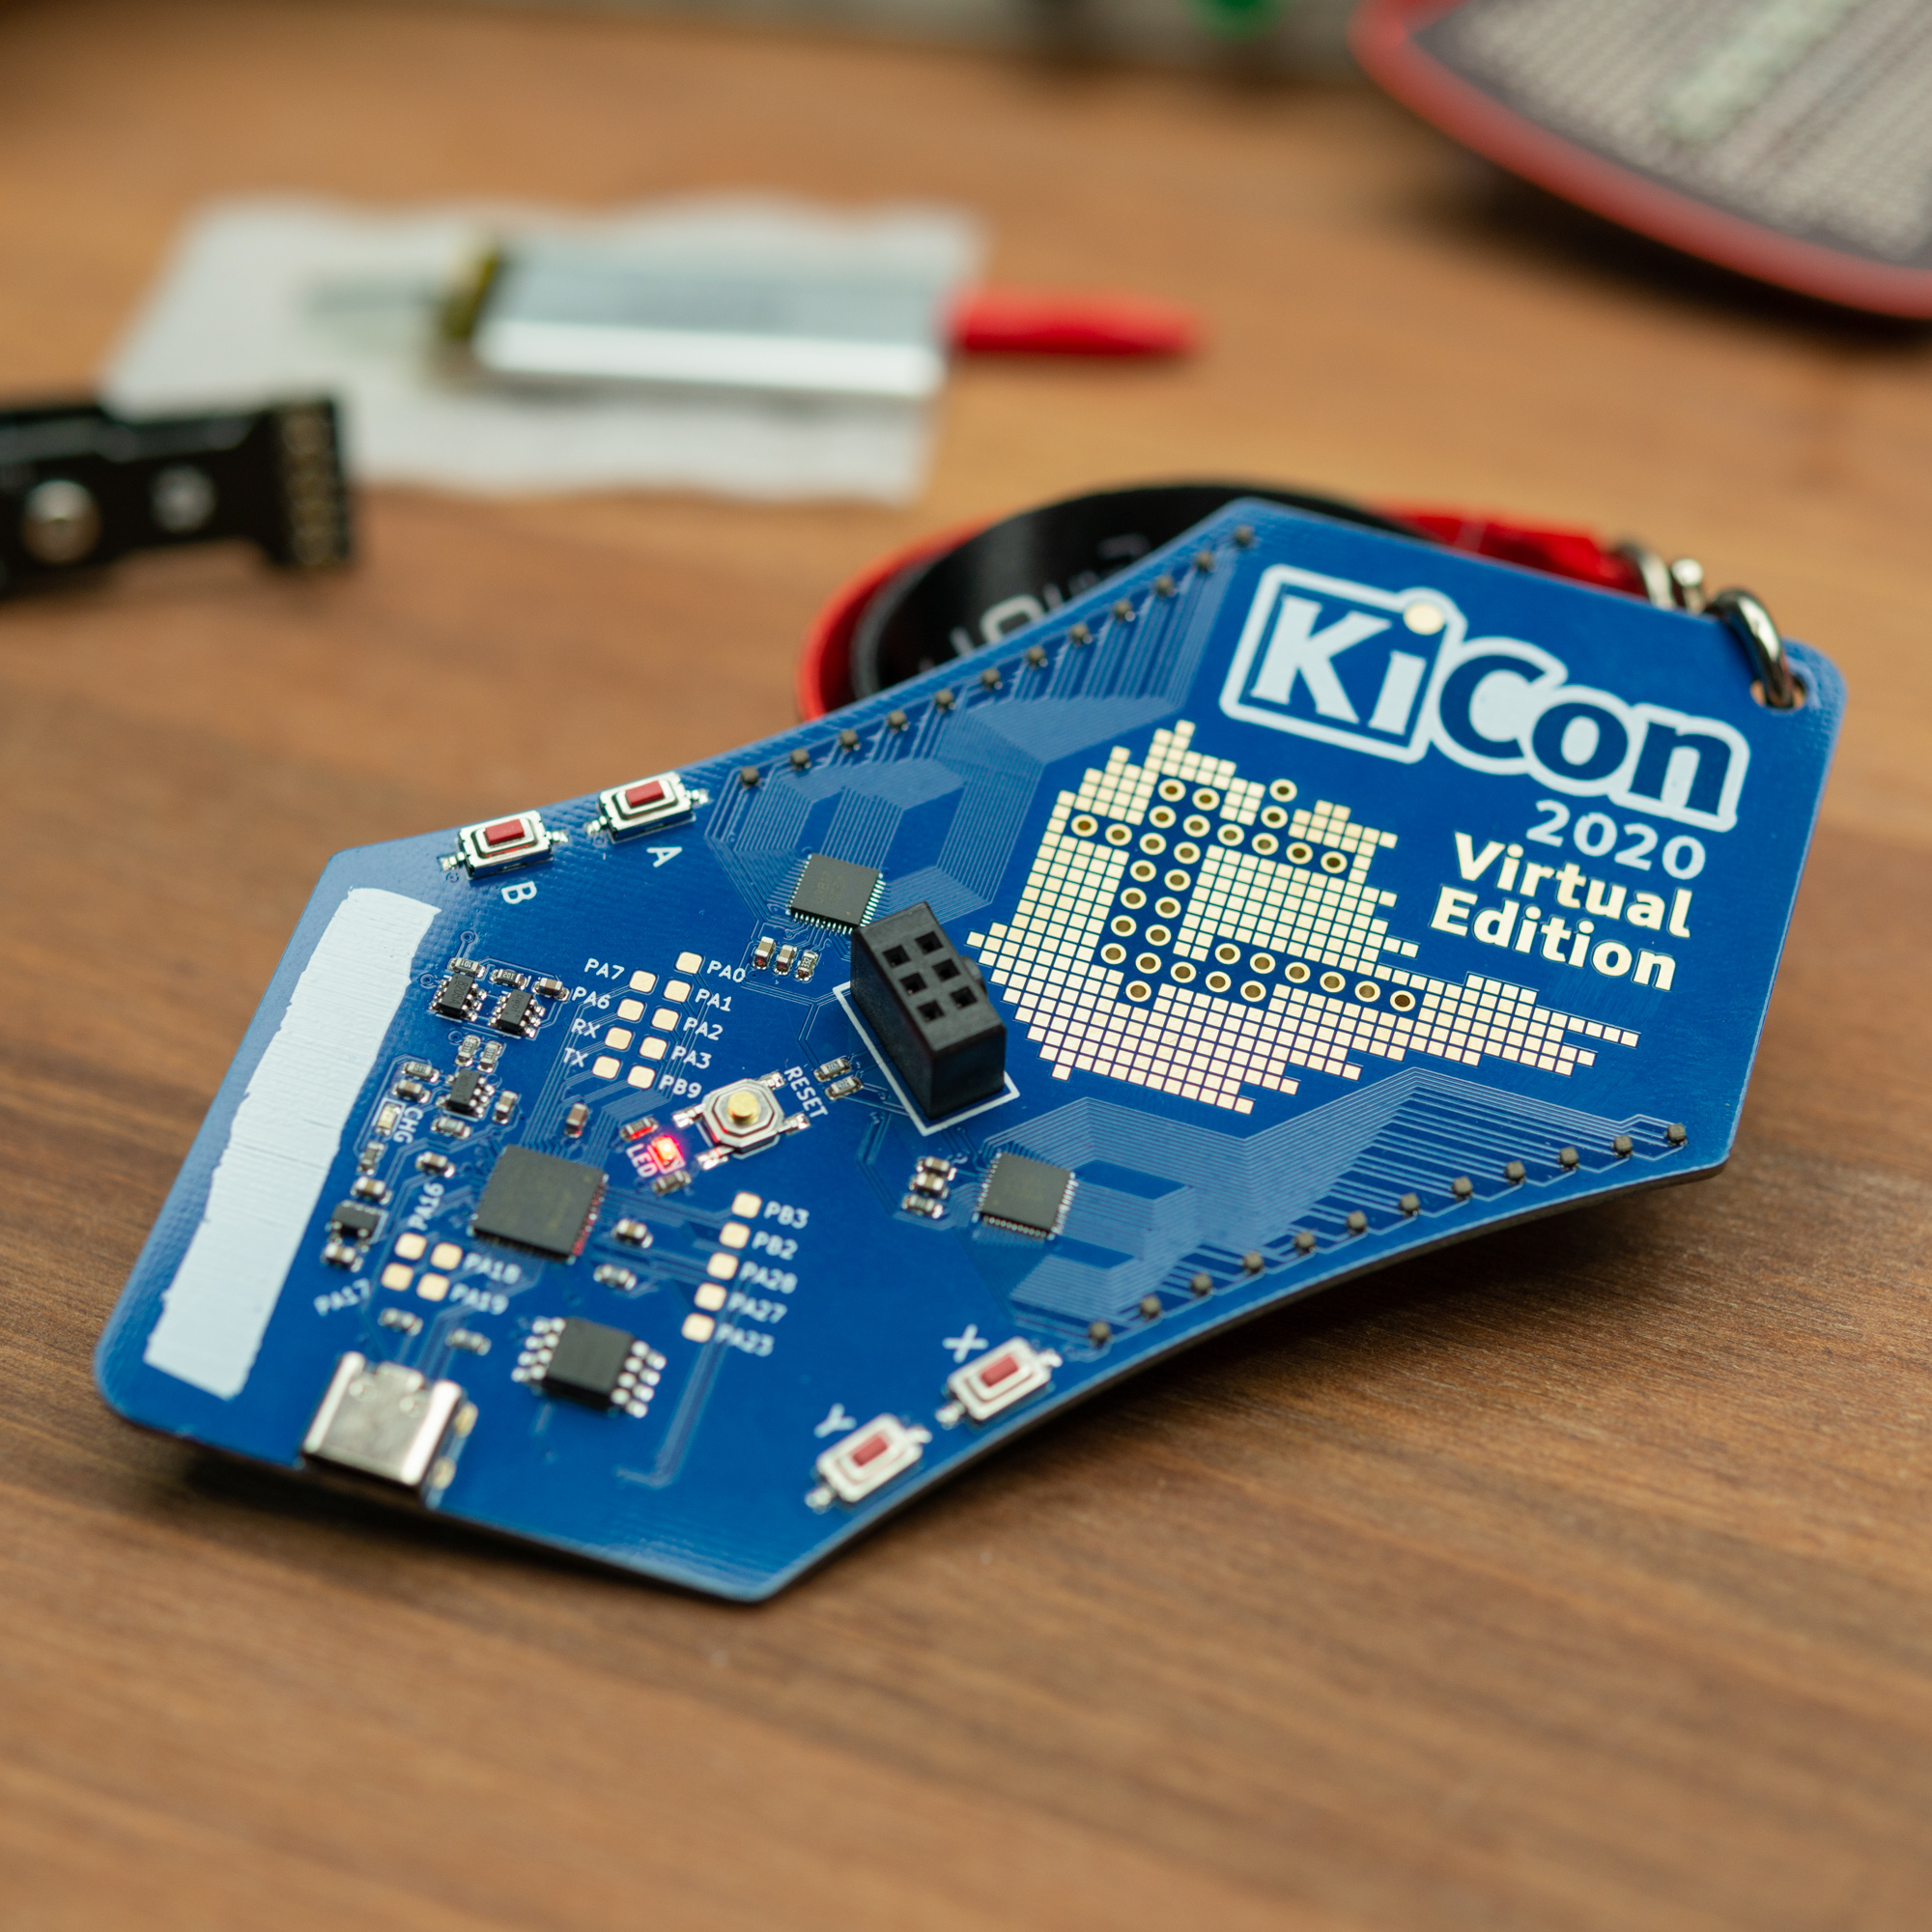
One of the things I was really exited about with this badge was the LiPo charge circuit. The LiPos I have do not include a protection circuit to prevent draining the cell below it’s minimum voltage, so that was also added to the circuit. The charge controller can be configured for different charge currents and I decised to use 500mA. For a 320mAh it’s probably a little acgressive, but this is a pack designed for RC hobby and rated for much higher charge rates, so I should be good. It actually seems like it’s the PMIC that is getting a bit hot. In the beginning of a charge cycle when the battery is empty, it gets so hot that you can’t really keep you finger on it and using a thermal camera, it looks like it get up to about 82°C initially but falls a little when some of the heat disipates out into the PCB.
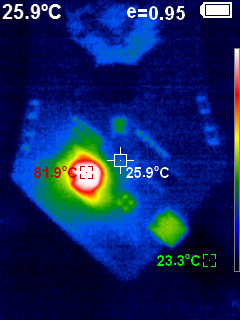
I have checked the datasheet and it seems like the internal thermal protection will shut off at 115°C so 82°C is probably OK. 500mA is within design specs for the PMIC.
Shortly after I shared my design, Greg Davill decided to get rid of the LED controllers and RGB LEDs and instead squeze in a 16x32 matrix, neatly stretching from side to side and keeping the main microcontroller and power circuit. This is the type of modifications I was hoping for and it was awesome to see video playing on the small screen a few weeks later.
— Greg 👻 (@GregDavill) October 12, 2020
Greg used the python scripting features in KiCad to place all the LEDs in a neat pattern, that followed the curved edges in both sides and distributing the spacing, for a smooth edge to edge experience.
- Gitlab repository: Unofficial KiCon 2020 Virtual Edition by Thomas Flummer (KiCad v6 files)
Unofficial Hackaday Remoticon 2020 Badge
The base idea with the Hackaday badge was very similar, that people could customize and make their own or simply order some exactly as I had designed them. For this design I skipped the template part, as it’s fairly easy to remove some or all of the elements I have added, so simply using the design as a template is very feasable.
I sadly did not participate in the first Hackaday Superconference, but I have seen images of the badge that Chris Gammel designed and I really like the “blank canvas” aspect when it comes to the electronics and it opens up for some creative hardware hacking.
I have tried to combine some of that simplicity with the Remoticon poster artwork by Aleksandar Bradic. Most of the badge is simply geometric shapes, some in the silkscreen layer, others using exposed copper with the gold finish, either small SMD pads, lines or regular plated through holes for mounting older parts or maybe a prototyping module designed for a breadboard.
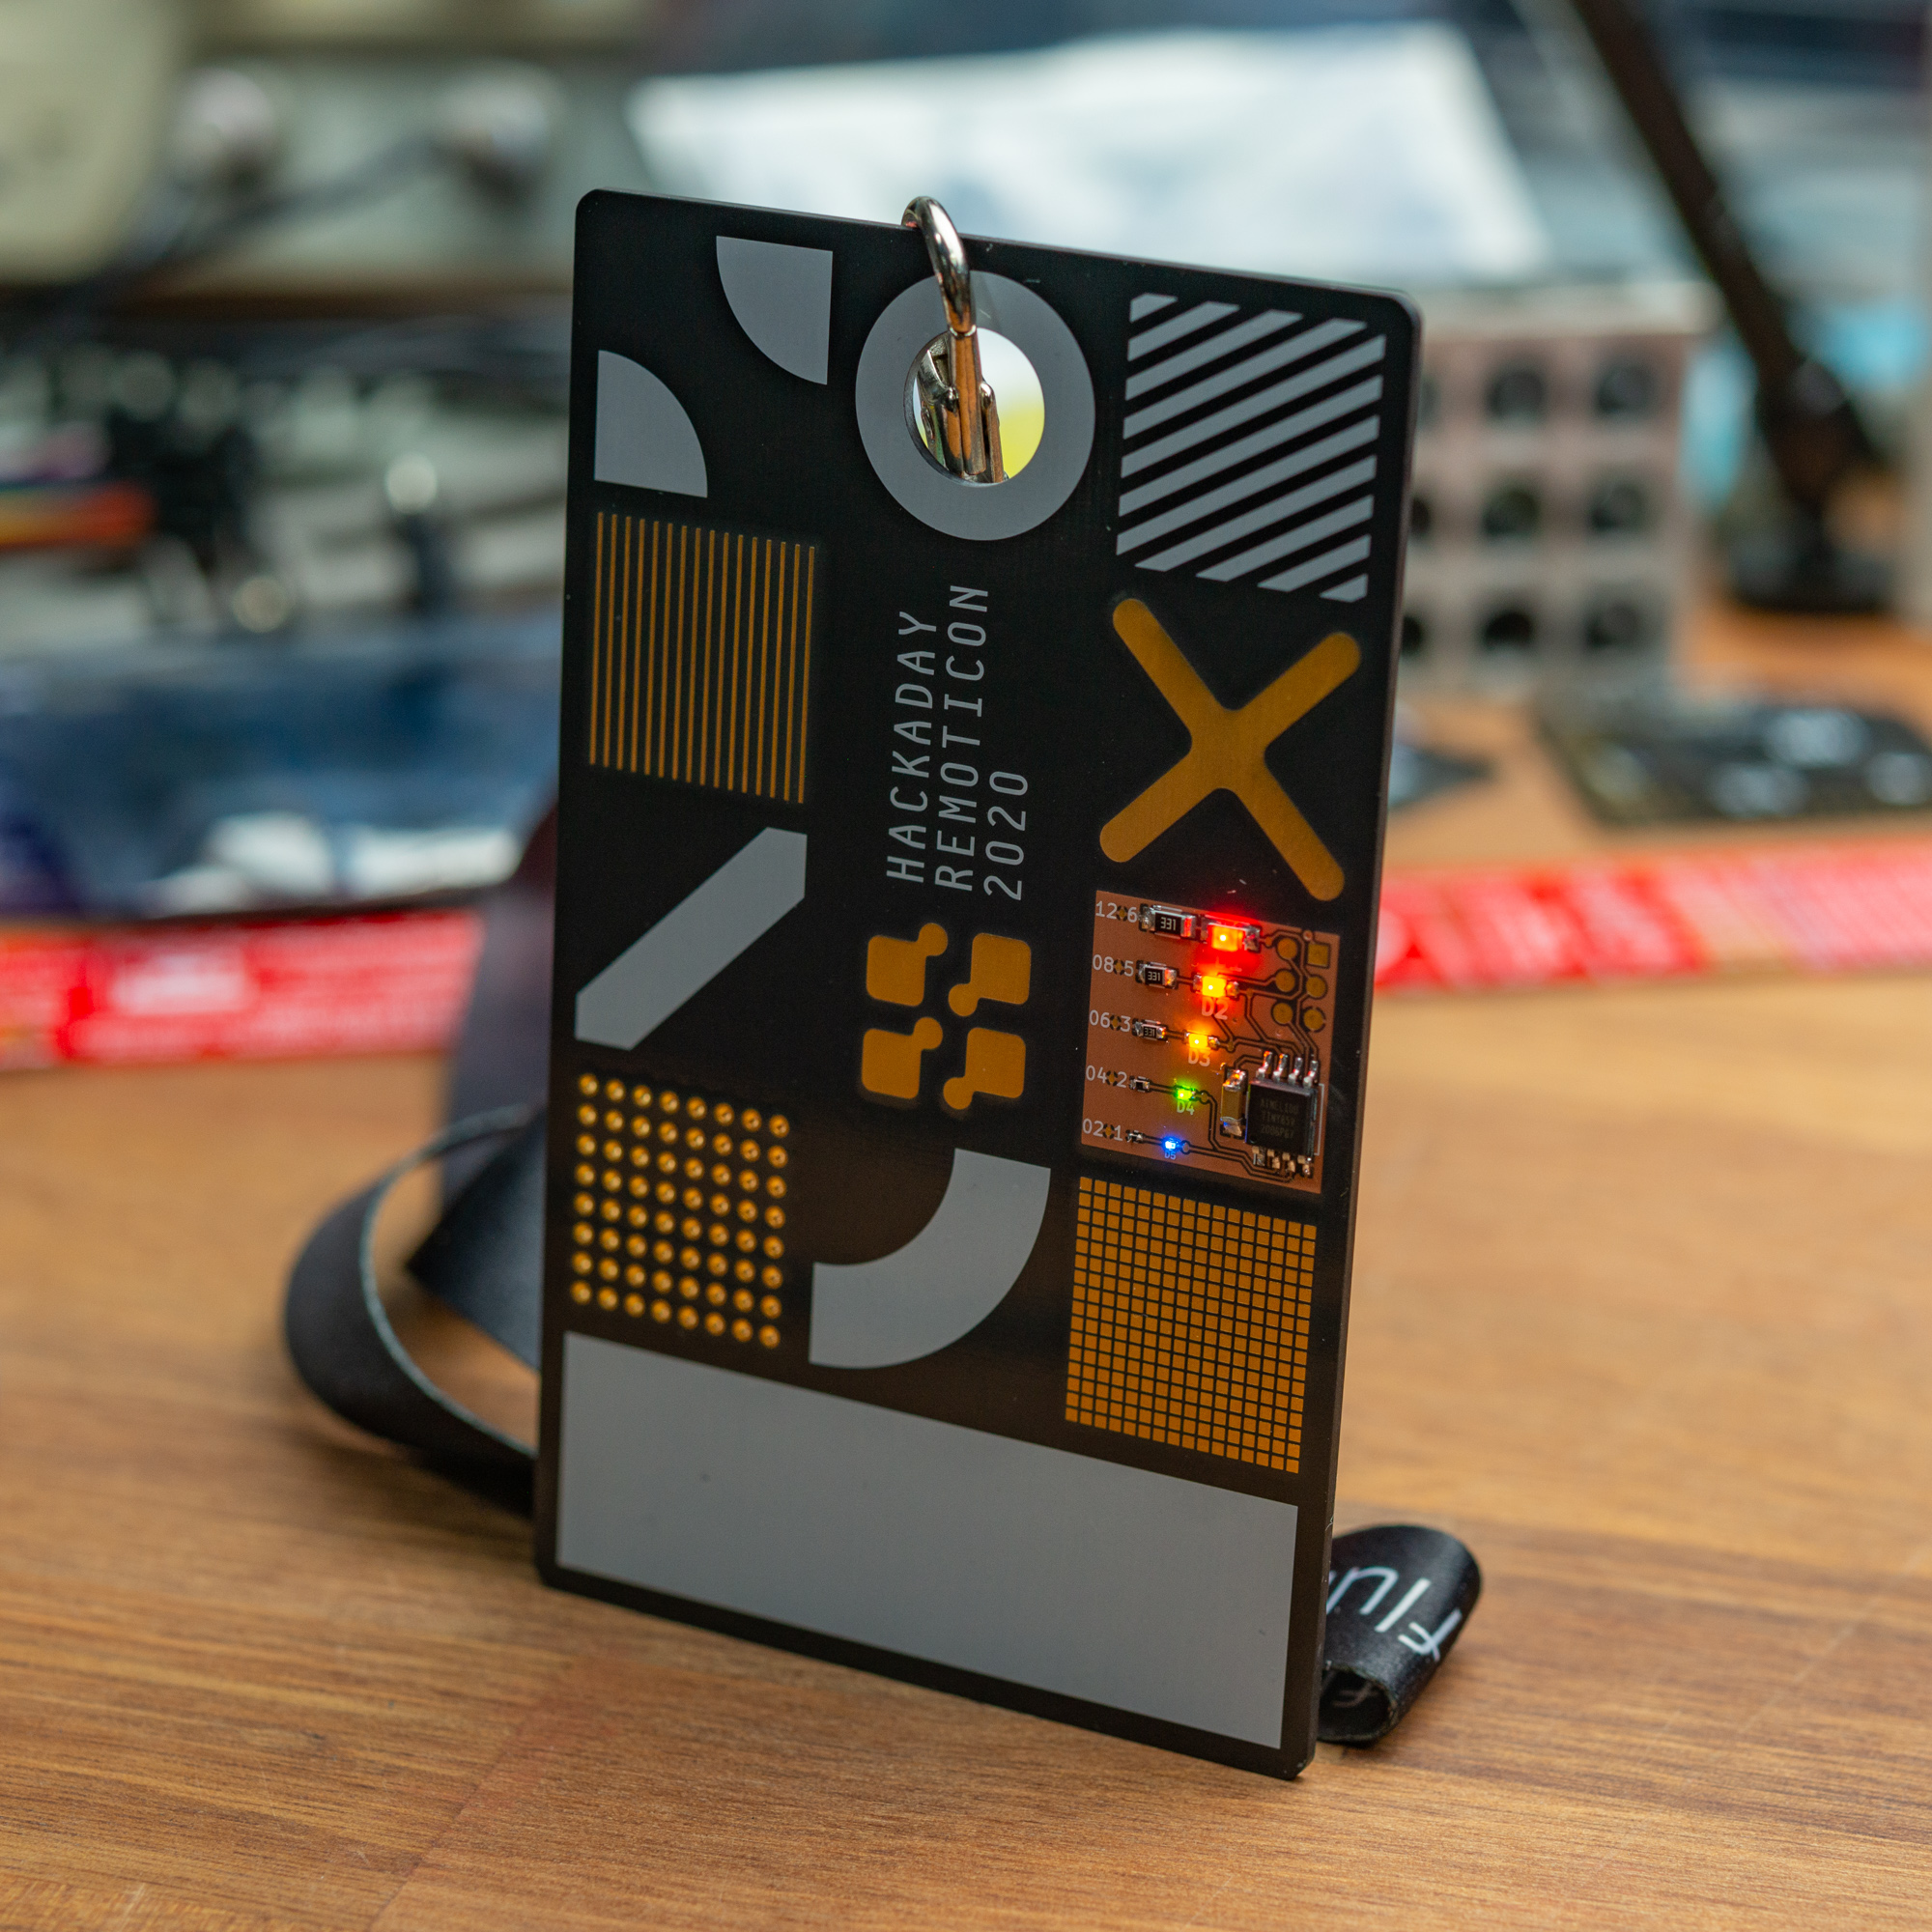
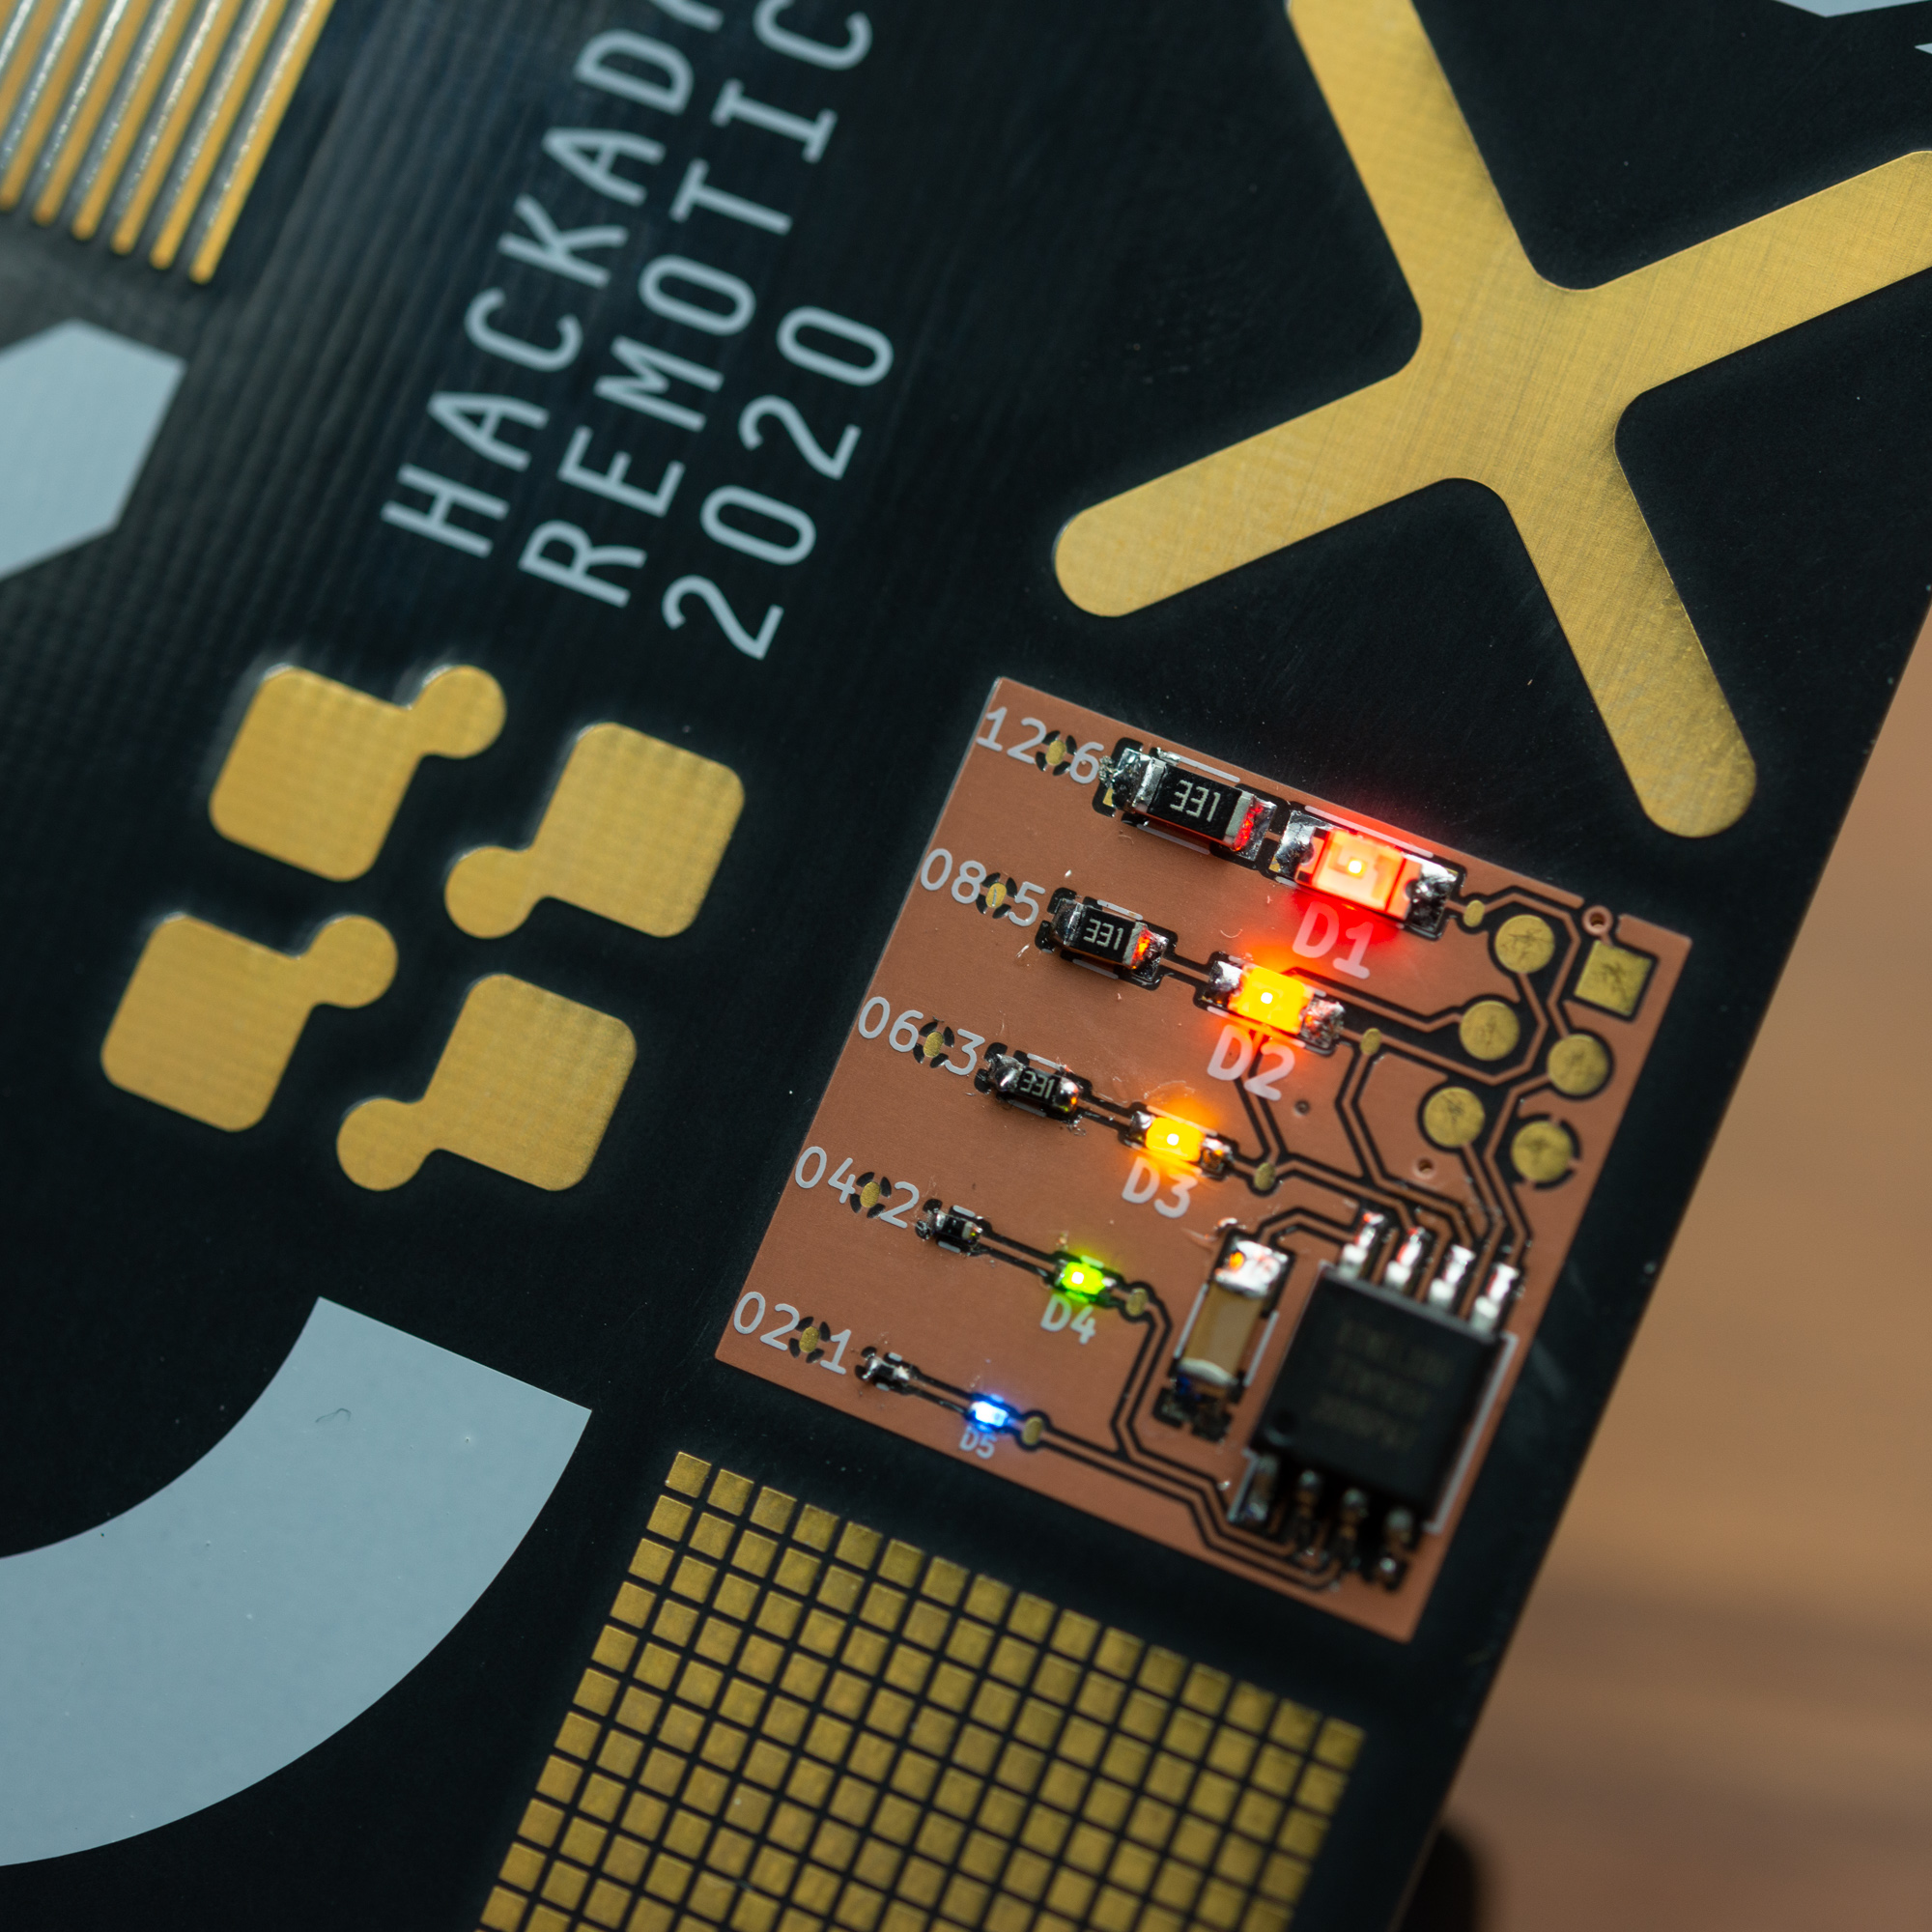
In an attempt to maybe bring a little of the feel of an in person Supercon to this event, I also included a variant of the SMD Challenge by The Makers Box on the front. It’s a very intesting challenge, even for people that have experience solderering SMD parts, because 0201 parts are just not designed for being soldered with a soldering iron.
To kickstart the hacking process I have added a footprint for an Adafruit Feather on the back of the badge. It’s not connected to anything, except for breaking out the connections, so that it’s easier to solder on a wire or similar. People familiar with Feather Wings will likely comment that the footprint is flipped, but that is intentionally, so that the Feather sits with the USB connection pointing out in the bottom, and the LiPo connector on the inside, and not least having all the parts facing in towards the badge for the thinnest possible design and least harsh for your clothes. Sharp pins or components can easily scratch you clothes so make sure to also add a little too much solder on the pins to make them nice and round.
I have decided to make these badges with OSH Park Afterdark, which has a very characteristic look, featuring the black FR4 material and super crisp silkscreen. The artwork with the logo and graphic elements is super sharp and the alignment between copper and silkscreen is very good, making it a joi abusing PCB production for mostly print artwork.
- GitHub repository: Unofficial Hackaday Remoticon 2020 badge by Thomas Flummer (KiCad v6 files)
- Shared OSH Park project: Get your own unofficial Hackaday Remoticon 2020 badge by Thomas Flummer